I took a break from the Brutus 10 clone build, through no fault of my own. I am back on track now though, and should have an update or two in the coming days. In the meantime...
I was at the store the other day purchasing some lovely alcoholic libations. There were two old people in front of me. They were REALLY slow, and they were really old. They were also pushing the limits of the "15 items or less" rule as stated by the sign. Listen Mortimer and Helen, if you have 14 tubs of denture cleaner, that does not count as one item, unless perhaps they are contained within some sort of jump pack, and are sold with one price. [This applies to everyone by the way] There were also several patrons in line behind me, and they were quite impatient. They were making snide remarks under their breath, and sighing heavily to display their discontent with the situation.
I started to think that perhaps as I have gotten older that I am just more tolerant to these kinds of predicaments. I did not care in the least bit that these elderly folk were jamming up the works at the local Kroger. I didn't care that they were probably buying more than 15 items in the clearly marked 15 items or less lane. Awesome, I am getting older, and therefore more mature, I am beginning to understand more and more how the world functions, and how humans grow and learn and adapt.
But then something else occurred to me. The impatient people behind me were older than I am, so rather than reveling in my new found skill of tolerance to meaningless situations that do not merit ill will, I came to realize that in general, people are just assholes, and that I had basically stayed the same. I am not an asshole. I suppose I could portray an asshole as a character if I chose, but I would be basing the character on people in line at the grocery store, and nothing inside my self. I suppose that, in and of itself, is a self realization, so it was not a total loss.
Completely different subject....
On the way home from work the other day at 6:30am [YEAH, AM], I saw a lady walking down the street. I mean she was IN the street, walking against the oncoming traffic. On the other side of the road, lay a perfect quality, recently renovated, nice, smooth sidewalk. This is rush hour traffic sweetheart. Well, as much as rush hour can be in a relatively residential part of a small Dallas suburb. Why would she do that?
I looked at her face as I drove by, and she appeared to be a sane, lucid, normal lady, approximately in her mid 50s. She did have a big ass, but her perhaps that was why she was walking in the first place. I could not associate the size of her ass to why she was walking in this fashion. I was, and still am, baffled by this. The only theory I could muster was that she was a crazy. A bona fide street walkin' crazy, and that her disguise was that of a "normie".
Whenever I see things like that, I always daydream that later, on the evening news, I will see a report of that same lady having been run over and killed. This rarely happens though. Or does it? What if my daydreams killed people? Hmmmm....
Thursday, June 17, 2010


Thursday, June 3, 2010
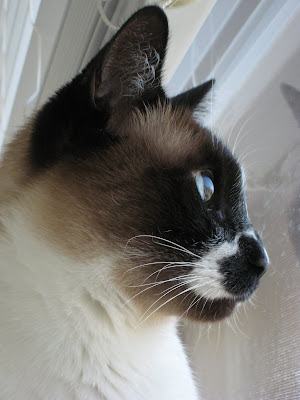
Been a few weeks. I have suffered a tremendous loss. We had to let our sweet baby Quasar kitty go. He had advanced heart disease which led to kidney failure. This caught us completely by surprise, because he had no symptoms, until one day he looked a little bit skinny. He had not been eating. We took him to the vet, and he weighed less than 7 pounds, after weighing around 10-11 pounds the majority of his life. The vet gave him some subcutaneous fluids and some pills to make him hungry, and drew blood for testing. The next day, the news was dire, and we were left with no choice but to have him put to sleep. I know beyond any doubt, that this was the absolute best, right, and only thing to do, but nonetheless, this devastated us to the core. We feel lost and empty without him.
We do not have children, so Quasar was our child. We loved him, and he loved us. We talked to him as if he was a normal family member, and he talked back. When we left the house, he would walk us to the door, and he would be right there when we got back, ready to greet us, and show us that he was grateful that we were back. He was a part of everything we did. He was our best friend. He was also more than that. He symbolized a constant in our lives. A symbol of continuity. He was a fixture that represented happiness and solidarity. I don't know if any of that makes sense, but it is hard to put into words. We saw him every single day, talked to him every single day, played with him every single day, and enjoyed his company every single day. So we will never completely overcome the lack of his presence.
He was a silly cat, so he matched our personalities perfectly. He also looked like a jigsaw puzzle of some sort, due to his unusual markings. When we adopted him in 2002, he had just been neutered, and was still reeling in the affects of the anesthesia. He was laying in his litter box. He tried to get up to engage us but was too 'drunk', and stumbled around until laying right back down in his litter. We knew right then and there, that he was for us. From then on, he always enjoyed cramming himself into cardboard boxes and plastic bags, so we made sure to always have one around for him to play with. He preferred the ones that were a little too small, so that he could barely fit inside them, much like his litter box the first day we saw him.
In the end, he remained proud and happy. I do not think he suffered very much at all. He was in good spirits and had his wits about him in his last few days. He stayed in his house a lot more than usual, but when he heard us stirring around doing this or that, he would still come out to check on us, and make sure we were ok, and that he didn't miss anything. I took the day off from work to take him to the vet, so I was able to spend the entire day with him, as well as the next day before the vet called with the bad news. He was fatigued and somewhat lethargic, but you could tell that mentally he was strong. He was still rubbing his face all over us and purring. My gal asked if she could hold him in her arms on the way to the vet for the last time. That is the image I keep thinking of over and over again. He looked tired, but still happy. He was glad to be with his momma and daddy.
A picture is worth more than words of course, so I will provide a montage for anyone who was not lucky enough to meet him, and to serve as a memorial for those who were. You can click on the images for larger versions.



We do not have children, so Quasar was our child. We loved him, and he loved us. We talked to him as if he was a normal family member, and he talked back. When we left the house, he would walk us to the door, and he would be right there when we got back, ready to greet us, and show us that he was grateful that we were back. He was a part of everything we did. He was our best friend. He was also more than that. He symbolized a constant in our lives. A symbol of continuity. He was a fixture that represented happiness and solidarity. I don't know if any of that makes sense, but it is hard to put into words. We saw him every single day, talked to him every single day, played with him every single day, and enjoyed his company every single day. So we will never completely overcome the lack of his presence.
He was a silly cat, so he matched our personalities perfectly. He also looked like a jigsaw puzzle of some sort, due to his unusual markings. When we adopted him in 2002, he had just been neutered, and was still reeling in the affects of the anesthesia. He was laying in his litter box. He tried to get up to engage us but was too 'drunk', and stumbled around until laying right back down in his litter. We knew right then and there, that he was for us. From then on, he always enjoyed cramming himself into cardboard boxes and plastic bags, so we made sure to always have one around for him to play with. He preferred the ones that were a little too small, so that he could barely fit inside them, much like his litter box the first day we saw him.
In the end, he remained proud and happy. I do not think he suffered very much at all. He was in good spirits and had his wits about him in his last few days. He stayed in his house a lot more than usual, but when he heard us stirring around doing this or that, he would still come out to check on us, and make sure we were ok, and that he didn't miss anything. I took the day off from work to take him to the vet, so I was able to spend the entire day with him, as well as the next day before the vet called with the bad news. He was fatigued and somewhat lethargic, but you could tell that mentally he was strong. He was still rubbing his face all over us and purring. My gal asked if she could hold him in her arms on the way to the vet for the last time. That is the image I keep thinking of over and over again. He looked tired, but still happy. He was glad to be with his momma and daddy.
A picture is worth more than words of course, so I will provide a montage for anyone who was not lucky enough to meet him, and to serve as a memorial for those who were. You can click on the images for larger versions.


Friday, May 14, 2010
Lately my house has felt really small, maybe because I have spent so much time there lately with the new shift work shit in effect. Anyway, it feels like a little fort. A fort where I stay, I look out the front door, and then walk the 50 feet or whatever to my back door and look out the back. It is starting to feel like just exactly what it is... 4 exterior walls covered by brick. That is what is supposed to make people feel all awesome because they own a house? I just don't get it. I need trees and stuff like that. I need to look out my windows and doors and see nothingness, just empty space. It has become my goal to make this happen, and I think I am setting things up pretty well to make that happen. My credit card debt is almost gone, and I have a fuck ton of equity built up as well. I would say in 6 months, I won't owe anyone anything, except for house debt, which is equity so it doesn't count, and my truck, which doesn't count because I will either always have a payment on vehicles, or I can just get something cheaper. It should be an awesome time. I will upgrade from a fort to a fortress. I have no idea where such a thing will be, but I suspect it will be duper cool.
For some reason, I stopped production on the brutus 10 clone. Not sure why, so I started up again. In my last post, I had just finished up the pump mount and housing. I decided to start on finishing up the kegs. I sort of decided to call my polishing job complete, even though the things are not mirror-like. On the mash tun, I will be covering it with insulating foam, so it does not need to be all shiny and pretty. I had the boil kettle polished to my liking more or less, and I decided to leave the hot liquor tank a little less than perfect, because A. it was really difficult to get it that way, and B. I wanted each of the three kegs to have a different look to them since they serve three different functions.
All 3 kegs need a ball valve, a sight glass, and a thermometer. The ball valve allows me to drain the kegs. A sight glass I can mark with increments so I know how much liquid is in them, and the thermometer is important so that I know the temperature of the liquid inside. It is debatable whether or not you really need a thermometer in the boil kettle because water boils at 212 degrees, and it will never get any hotter than that. I look at it as a continuity function, and just in case I ever want to use the brew kettle as anything else, now I can. So in order to install these items you need a bit that it capable of drilling through stainless steel. I went with a step bit. These are heavy duty drill bits that are beveled so that you can drill a variety of hole sizes. They look like this:

So basically you just drill the correct size hole that you need for the various parts. I needed a large hole for my ball valve and a small hole for my sight glass/thermometer combo. Here is a picture of the parts that need to be installed, and a picture of one of the holes I drilled to make this happen, to give you an idea of how the parts go together. Also I included a picture of the final product after the parts are installed.


You will also notice I installed an eye bolt through the upper lip of the keg. This was not my idea, it is pretty much the accepted standard for keeping your sight glass in place.

Anyhoo, it is coming along nicely, hopefully I will be cranking out mass amounts of beer soon.
Thursday, April 22, 2010
Wow, what happened there, I sort of evaporated.
Chevy Chase was quoted the other day as saying the 80s were a sort of response to the 70s. I fully agree with him. I stared thinking about the decades in my life time. The 70s were a strange time... Hippies, free love, transient lifestyles, and so on. Then the 80s came along and suddenly hippies gave way to yuppies, and materialism became important. Instead of dull drab brown clothes, there were exciting flashy clothes and such. People starting worrying about things like STDs and finances. Just say no to drugs. Then in the 90s, it sort of swung back the other way, grunge music became popular, as did its related clothing of flannel and boots. People sort of went back to the who cares attitude. Say yes to drugs. Then in the 2000s it sorta went back the other way. Anyway, I could go on and on, but it would take hours. It was just a passing thought and something you should reflect on in your spare time, to try and figure out what will happen in the 2010s, so you can have the upper hand and stay ahead of the game.
So back to the build. The next step in the journey to the Brutus 10 clone was to visit moving liquid from one vessel to another during the brewing process. The gold standard pump for brewing stands is the March 809. I procured one from eBay for about 100 bucks. Now I had to mount it on the structure. I decided to use some leftover steel from my wheel mounts and make a bracket. It ended up looking like this:


Next I needed some sort of cover for it, to prevent it from getting too hot from the burner above it, and to shield it from any boil over that may occur during the brewing process. For this, I bought a piece of sheet steel from Home Depot for a few bucks, and just bent it into shape, using a sort of jig I threw together.

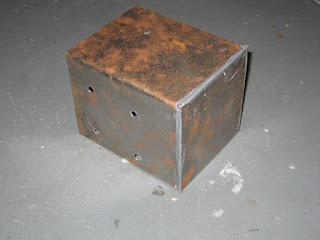
I promise this cover is not nearly as rusty as it appears in the photo. Also you will notice JB weld! I learned that no matter how low you set the power on your welder, you still cannot weld really thin gauge steel without blowing a hole in it. So I had to resort to JB Weld to hold the back panel of the cover together. No big deal though, JB Weld is sandable and paintable, so when I am done, no one will ever know the difference.
Also, I did not like the way my gas plumbing was routed so I bought a few 90 degree angle pieces to keep the lines away from the heat of the burner, and to make it look better. I will take pictures of that for the next episode. This post was just get me back into the swing of things. Also, it is really hard to take pictures in my garage right now, because it is full of other stuff I have had to use recently for yard work and whatnot. I will be cleaning up the garage and getting back to building this thing by the end of the day.
Ok, back to worky.
Chevy Chase was quoted the other day as saying the 80s were a sort of response to the 70s. I fully agree with him. I stared thinking about the decades in my life time. The 70s were a strange time... Hippies, free love, transient lifestyles, and so on. Then the 80s came along and suddenly hippies gave way to yuppies, and materialism became important. Instead of dull drab brown clothes, there were exciting flashy clothes and such. People starting worrying about things like STDs and finances. Just say no to drugs. Then in the 90s, it sort of swung back the other way, grunge music became popular, as did its related clothing of flannel and boots. People sort of went back to the who cares attitude. Say yes to drugs. Then in the 2000s it sorta went back the other way. Anyway, I could go on and on, but it would take hours. It was just a passing thought and something you should reflect on in your spare time, to try and figure out what will happen in the 2010s, so you can have the upper hand and stay ahead of the game.
So back to the build. The next step in the journey to the Brutus 10 clone was to visit moving liquid from one vessel to another during the brewing process. The gold standard pump for brewing stands is the March 809. I procured one from eBay for about 100 bucks. Now I had to mount it on the structure. I decided to use some leftover steel from my wheel mounts and make a bracket. It ended up looking like this:


Next I needed some sort of cover for it, to prevent it from getting too hot from the burner above it, and to shield it from any boil over that may occur during the brewing process. For this, I bought a piece of sheet steel from Home Depot for a few bucks, and just bent it into shape, using a sort of jig I threw together.


I promise this cover is not nearly as rusty as it appears in the photo. Also you will notice JB weld! I learned that no matter how low you set the power on your welder, you still cannot weld really thin gauge steel without blowing a hole in it. So I had to resort to JB Weld to hold the back panel of the cover together. No big deal though, JB Weld is sandable and paintable, so when I am done, no one will ever know the difference.
Also, I did not like the way my gas plumbing was routed so I bought a few 90 degree angle pieces to keep the lines away from the heat of the burner, and to make it look better. I will take pictures of that for the next episode. This post was just get me back into the swing of things. Also, it is really hard to take pictures in my garage right now, because it is full of other stuff I have had to use recently for yard work and whatnot. I will be cleaning up the garage and getting back to building this thing by the end of the day.
Ok, back to worky.
Friday, March 19, 2010
I need the ocean! So I am going there. I have not been in a while since I got stuck on going to Las Vegas for vacations. Strangely, Las Vegas seems to be the absolute cheapest vacation you can take. If you go there once or twice, they start giving you free rooms, even if you don't gamble much. So I started going there over and over again instead of making some sort of annual pilgrimage to the ocean. For me, there is just something about being by the sea and seeing how vast and powerful it is. The smell of it and the sound it just takes me to a place that makes me wonder and dream, and it also makes me realize how small and meaningless life can really be. In 10,000 years, that ocean will still be there making that same sound and same smell. So in the grand scheme of things, the small things that stress people out on a day to day basis are really just stupid things to worry about. Sure, that guy that cuts you off in traffic is a real dick, but do you really care?
Anyway, so next week I am going to Vegas for vacation 8-), and then when it warms up a little more, like in a month, I am going to go to the ocean for a few days, and I am going to just sit there and stare at it for hours on end, and see what happens.
Ok, back to the Brutus 10 clone build. So, I decided to climb on the structure and jump around to see what happened. What happened? I think nothing, but at the time I think I sort of imagined that it was a little bendy, so I added more supports. The model has a single vertical support, so as usual I went above and beyond that. Overkill? Probably. Not much to say here, I will let the pictures speak for themselves. At this point, I am getting pretty good at welding. I still lay a stinker every once in a while, but they are few and far between.


So now it was time to add some wheels to the rig. I went with casters that can handle 240 pounds each. So 4 would handle 960 pounds. Again, overkill. The kegs weigh about 30 pounds each when empty. So that's 90 pounds. Under worst case scenario conditions, say I have all 3 filled to the brim with water, that's another 15 (gals) x 8 (pounds/per) x 3 (kegs) = 360 pounds. So now we are up to 450. Factor in the steel structure, and that's another probably 100 pounds. So 550, plus add hoses, connectors, pumps, buttons, lids, plumbing, etc... I could see it being 700 pounds. So 960 pounds of support from the casters should be ample. Also, I went with locking casters so the damn thing wouldn't roll away with my beer in it. So the next challenge was to mount them. I had this idea swimming around in my head as to how to do it, and when I read a a post on homebrewtalk.com about someone doing it the same way, I figured it would work well. The plan, Take some steel, drill a hole in it, and weld a nut on top of the hole, so the threaded stem from the caster can screw into that.


Is this amount of welding overkill? You decide. Do I know any better? nope. I don't recall getting a memo, or seeing any instructions anywhere on how to weld a nut to a piece of steel. Better safe then sorry I suppose.

So then I moved in to plumbing. Some people build these things where their propane or natural gas travels through one of the structural beams. I have little faith in my welding skills, so trying to weld something that can withstand internal pressure of the gas seemed like a bad plan, so from the start, I planned on having external plumbing, and standard black steel pipe seems to be the most widely accepted solution. So a trip to the hardware store later I had all these pieces.
Anyway, so next week I am going to Vegas for vacation 8-), and then when it warms up a little more, like in a month, I am going to go to the ocean for a few days, and I am going to just sit there and stare at it for hours on end, and see what happens.
Ok, back to the Brutus 10 clone build. So, I decided to climb on the structure and jump around to see what happened. What happened? I think nothing, but at the time I think I sort of imagined that it was a little bendy, so I added more supports. The model has a single vertical support, so as usual I went above and beyond that. Overkill? Probably. Not much to say here, I will let the pictures speak for themselves. At this point, I am getting pretty good at welding. I still lay a stinker every once in a while, but they are few and far between.


So now it was time to add some wheels to the rig. I went with casters that can handle 240 pounds each. So 4 would handle 960 pounds. Again, overkill. The kegs weigh about 30 pounds each when empty. So that's 90 pounds. Under worst case scenario conditions, say I have all 3 filled to the brim with water, that's another 15 (gals) x 8 (pounds/per) x 3 (kegs) = 360 pounds. So now we are up to 450. Factor in the steel structure, and that's another probably 100 pounds. So 550, plus add hoses, connectors, pumps, buttons, lids, plumbing, etc... I could see it being 700 pounds. So 960 pounds of support from the casters should be ample. Also, I went with locking casters so the damn thing wouldn't roll away with my beer in it. So the next challenge was to mount them. I had this idea swimming around in my head as to how to do it, and when I read a a post on homebrewtalk.com about someone doing it the same way, I figured it would work well. The plan, Take some steel, drill a hole in it, and weld a nut on top of the hole, so the threaded stem from the caster can screw into that.


Is this amount of welding overkill? You decide. Do I know any better? nope. I don't recall getting a memo, or seeing any instructions anywhere on how to weld a nut to a piece of steel. Better safe then sorry I suppose.

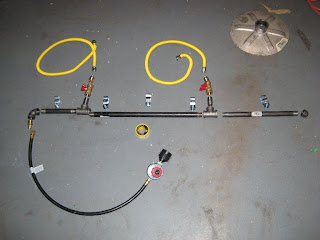
So then I moved in to plumbing. Some people build these things where their propane or natural gas travels through one of the structural beams. I have little faith in my welding skills, so trying to weld something that can withstand internal pressure of the gas seemed like a bad plan, so from the start, I planned on having external plumbing, and standard black steel pipe seems to be the most widely accepted solution. So a trip to the hardware store later I had all these pieces.

So when assembled it looks like this.
Next, I had to mount the plumbing system to the structure. I located some relatively thick pipe hangers and welded them in place.
By the way, here is what happens when you try to weld really thin stuff, it essentially just burns away.
All in place, nice! It is really starting to shape up. Still a lot of work to do though.
Saturday, March 13, 2010
Nostalgia! - I know I have talked about nostalgia quite a bit in my posts, but I am about to do it again. You know how people sit around and talk about the good times? Well, you could be having a good time right now and not know it yet, without the benefit of hindsight. As I wind down my time at my current employer and prepare to go elsewhere, I started thinking about how fun it used to be at my job several years ago. I don't recall feeling particularly fond of those times while they were happening, but looking back now, those were some damn fine times. Maybe because things suck so bad right now. So anyway, it made me think that when I get to my new job, I should try and enjoy it as it happens, rather than having to have it pass, and then think about how cool it was in hindsight. I am going to try really hard.
OK, so more Brutus 10 fun and excitement. Now that I have the top of the frame laid out and welded up, it is time to add some cross members and legs and such, and get this thing looking like a Brutus should.
Welding in the cross members is pretty simple work. I put in a total of 4 across the top, one for each side of the three kegs, and of course the outside of the frame acts as the other two keg supports.


If anyone is keeping score, I promise this will get more interesting once I get past the basic structure build out.
OK, so more Brutus 10 fun and excitement. Now that I have the top of the frame laid out and welded up, it is time to add some cross members and legs and such, and get this thing looking like a Brutus should.
Welding in the cross members is pretty simple work. I put in a total of 4 across the top, one for each side of the three kegs, and of course the outside of the frame acts as the other two keg supports.

Next came the legs. I bought a shitty 90 degree jig at home depot for 6 bucks to help hold everything perpendiculous while I tacked it in place with the welder. Once tacked, I was able to fill it in right.


So after the legs were on, it was time to get the burners in place. I figured the best thing to do was to just sort of hang them in there. So I took some 1" steel and drilled some holes in it so the burners could be adjustable and welded them to the insides of the frame on the two spots where the burners will be.


You may notice I only have two burners instead of three. Why? Well, you may remember a few posts back when I talked briefly about the mash lauter tun or MLT. The MLT holds the grains and the water at a steady temperature for a certain amount of time. With a properly insulated MLT, there is no need to directly fire this vessel. So I have opted for quality insulation versus direct heat to maintain the temperature level. I'll cover the insulation at a later date. Also, another reason is because I employ a technique called batch sparging, where I let the grains set in a batch of water at the right temperature for a certain amount of time, then drain it into the brew kettle, and then add another batch of water at higher temperature to bring on a different reaction from the grains. I will go over all that stuff later when I do a post on the maiden voyage of this bad boy.
If anyone is keeping score, I promise this will get more interesting once I get past the basic structure build out.
Friday, March 5, 2010
I was drinking a Coke the other day, and began to think about it's color. It was brown. When I pee, it comes out clearish yellow. Where does the color go? Are my guts brown now because I drank too many soft drinks? What about Koolaid and stuff like that? I guess my insides look like a rainbow by now.
Ok, so, to continue my series on the Brutus 10 clone build, the next phase was to get the structure started. Initially I was going to make the next phase polishing up the kegs to make them all shiny and awesome looking. I did start that aspect of the project, but moved on to the structure build because it is more exciting. Since the structure is made of steel, I needed to procure a few new things. First and foremost was a welder.
There are many different types of welders on the market, and they can be quite expensive. My goal was to find a welder that was relatively inexpensive, but one that would still do the job. Without going into too much detail on the various types of welders, I settled on a flux-core welder, because the device was low cost, and I didn't have to mess with separate welding gas tanks, and it would still do what I required. I went with the Campbell Hausfeld flux-core wire feed welder. The welder was 129 bucks, 92 of which was free money I received for doing surveys online for money.

Next I needed a stack of steel to build with. After a quick search around the interwebs, I located speedymetals.com, and settled on 1.5" square tubing with a 1/16" wall thickness. Is this overkill? Probably. Will it look cool though? Absolutely. This steel was $155 shipped. I bought more than I needed because I was almost certain I would screw up a few times, and didn't want to run out. I bought ten 6 foot long pieces.


If you remember from some of my other projects, I purchased a pretty nice Ryobi compound mitre, so to cut all this steel, I simply had to purchase a steel cutting blade for a few bucks.

So after chopping up the steel, I had to weld this crap together. I have welded in the past. I took a metal fabrication class in high school, and then during my college days, I took a few classes in the metal shop. So I am no stranger to welding, but I have not done it in well over 15 years. So I headed to Home Depot and picked up some sheet metal to lay some test beads.


I am trying to blow through all this pretty quick, to keep the articles short, because a picture is worth 1000 words, but there is a lot of information and thought processes I am leaving out. For example, I decided to go with 45 degree angles on the steel, so that the top of the structure would be completely sealed, and have the added structural bonus of sitting on top of the legs rather than stressing my welds by having it all done at 90 degree angles. 3 full kegs of water and grains can be pretty heavy, I'd rather not have it fall on my face.
Also, I am leaving out all the little tidbits I learned along the way, such as, it is probably a good idea to remove the sawdust collection bag from the mitre saw when cutting through steel, because the sparks fly like a mother fucker all over the place. Speaking of sparks, probably should make sure they don't fly out the sides of your steel into a gas can 8-). Also, ALWAYS ALWAYS ALWAYS ALWAYS ALWAYS ALWAYS ALWAYS ALWAYS wear your safety goggles and a good pair of work gloves.
Anyway, I have lot of more information like that so maybe I will do a few posts from time to time during the process just dedicated to helpful tidbits, or maybe do one dedicated post filled with all that kinda crap when the project is done.
That is enough for now. If I gloss over something important, please let me know and I will try and cover it in a reply, or with a future post.
Ok, so, to continue my series on the Brutus 10 clone build, the next phase was to get the structure started. Initially I was going to make the next phase polishing up the kegs to make them all shiny and awesome looking. I did start that aspect of the project, but moved on to the structure build because it is more exciting. Since the structure is made of steel, I needed to procure a few new things. First and foremost was a welder.
There are many different types of welders on the market, and they can be quite expensive. My goal was to find a welder that was relatively inexpensive, but one that would still do the job. Without going into too much detail on the various types of welders, I settled on a flux-core welder, because the device was low cost, and I didn't have to mess with separate welding gas tanks, and it would still do what I required. I went with the Campbell Hausfeld flux-core wire feed welder. The welder was 129 bucks, 92 of which was free money I received for doing surveys online for money.

Next I needed a stack of steel to build with. After a quick search around the interwebs, I located speedymetals.com, and settled on 1.5" square tubing with a 1/16" wall thickness. Is this overkill? Probably. Will it look cool though? Absolutely. This steel was $155 shipped. I bought more than I needed because I was almost certain I would screw up a few times, and didn't want to run out. I bought ten 6 foot long pieces.


If you remember from some of my other projects, I purchased a pretty nice Ryobi compound mitre, so to cut all this steel, I simply had to purchase a steel cutting blade for a few bucks.

So after chopping up the steel, I had to weld this crap together. I have welded in the past. I took a metal fabrication class in high school, and then during my college days, I took a few classes in the metal shop. So I am no stranger to welding, but I have not done it in well over 15 years. So I headed to Home Depot and picked up some sheet metal to lay some test beads.

I did more test beads than depicted here by the way, this was just when I chose to take a picture. Next, I moved on to the real welding. First step was to layout the steel, and tack weld it in place. Then finally, weld it all up, and grind it down to make it look nice.


I am trying to blow through all this pretty quick, to keep the articles short, because a picture is worth 1000 words, but there is a lot of information and thought processes I am leaving out. For example, I decided to go with 45 degree angles on the steel, so that the top of the structure would be completely sealed, and have the added structural bonus of sitting on top of the legs rather than stressing my welds by having it all done at 90 degree angles. 3 full kegs of water and grains can be pretty heavy, I'd rather not have it fall on my face.
Also, I am leaving out all the little tidbits I learned along the way, such as, it is probably a good idea to remove the sawdust collection bag from the mitre saw when cutting through steel, because the sparks fly like a mother fucker all over the place. Speaking of sparks, probably should make sure they don't fly out the sides of your steel into a gas can 8-). Also, ALWAYS ALWAYS ALWAYS ALWAYS ALWAYS ALWAYS ALWAYS ALWAYS wear your safety goggles and a good pair of work gloves.
Anyway, I have lot of more information like that so maybe I will do a few posts from time to time during the process just dedicated to helpful tidbits, or maybe do one dedicated post filled with all that kinda crap when the project is done.
That is enough for now. If I gloss over something important, please let me know and I will try and cover it in a reply, or with a future post.
Thursday, February 25, 2010
Ok, been a while. Things got real fucked at work, and I am in the process of trying to locate a new job, so I have been mentally preoccupied for a while. Anyway, time to start my series on my latest project, a Brutus 10 clone. What is a Brutus 10 you ask?
A Brutus 10 is a device used to make more consistent, and optionally larger batches of beer, quicker, and more efficiently. I have been wanting one for years, but they are ungodly expensive to purchase. I didn't want to foot the bill on a credit card, and saving my pennies takes too long. So I have decided to build one myself. This way, I gain a lot of valuable skills, I can customize it to suit my particular needs, and I can enjoy the satisfaction of producing something lovely and useful, that will last a lifetime. Plus, my Brutus 10 clone will be better than yours, until you build one yourself, so suck it.
The first thing I needed to obtain as the basis for the entire system was three standard half barrel kegs. These are your typical run of the mill 15.5 gallon kegs your mom probably saw a lot of in college.
Why do I need three? Well, one is your "hot liquor tank" or HLT. This one simply holds and heats the water necessary for the entire brewing process. Secondly, you need a "mash/lauter tun" or MLT. This is where you put the grains and extract the fermentable sugars using the water from the HLT. Lastly, you need a brew kettle, where the beer will be brewed.
Locating kegs can be a daunting task because it can be a shady unethical business. When you put down the deposit on a keg full of beer, you DO NOT 'own' the keg. The deposit is there to ensure that you return it so the distributor does not lose money. Kegs are expensive to build, maintain, and distribute. Purchasing kegs from a reputable dealer is very expensive. So, for me, the plan was to fall somewhere in between the shady business and full retail price. A lot of the ads seen on Craig's List said things like "no questions asked", or "I just need this to be gone". So I stayed away from those. Just about when I was to the point of paying full retail price, an ad came along that said basically "3 kegs, great condition", and didn't have a shady vibe. I offered the guy 40 bucks each, instead of the 50 each he was asking. Since I wanted all three, he accepted.
So, the next challenge to converting kegs into brewing equipment is to cut out the tops. This required purchasing a quality angle grinder.

Next, you need to remove the stems from the kegs. I won't go into detail because that information is widely available elsewhere. In a nutshell, you remove the retaining ring and just pull it out.

Then, you need some sort of contraption to hold the grinder vertically and cut a perfect circle in the top. I made this out of some old 2x4s I had laying in the garage. I used one of the stems as pivot point, since it fit in the existing hole perfectly. I ended up just sort of holding the grinder against the 2x4, rather than fastening to the jog, because it just seemed easier at the time, and appeared to work well.

Here is what the tops looked like after removal.

And finally, here is what the kegs looked like after the tops were removed.

I forgot to take pictures of the kegs prior to removing the tops, but if you have seen one keg, you have seen them all.
That is enough for now. For the next post in a few days, I will get into preparing for, and starting, the structural build, including my adventure into welding.
Subscribe to:
Posts (Atom)